Paper Piecing Memories by Babs

Paper Piecing Memories by Babs

Tuesday, November 29, 2011

Snow Globe Shaker Cards

For those of you who have asked how to create these shaker cards, I've created a step by step instruction. I've included photos of each step along the way.

MATERIALS NEEDED:

Digital Image from Treasure Box Designs (reduced to approx. 2 1/2 inches tall)
5x7 card (either store bought or one created from cardstock)
4 3/4 x 5 3/4 inch of red cardstock
4 1/2 x 5 1/2 inch patterned paper (for top of card)
2 x 4 1/2 inch  patterned paper (for top of card)
Piece of clear acetate
white cardstock for snow drift
sparkled white cardstock (for frame of snow globe)
ribbon
2 snowflake brads
teaspoon (approx.) of Martha Stewart Tinsel Glitter
Saying Stamp (I used "Joy to the World" and "Wishing you and yours a blessed Christmas!" for the inside)
Candy Cane embellishment (or whichever you would like to use)
snowflake patterned paper (for inside snow globe)
brown cardstock (for snow globe base)
chipboard
Adhesive tape
Pop Dots
Glue ( I used Tombo Mono and Beacon's 3-in-1 Advanced Craft Glue)
Cut a 4 1/2 circle out of the patterned snowflake paper and another out of the acetate. IMPORTANT: acetate easily gets smudged with glue, so always be careful when handling it
Cut a 4 1/2 inch circle out of white cardstock and another out of chipboard. Cut out the center of the circles, leaving a 1/4 inch frame. I used a circle template and an Exacto knife to cut the chipbard. Ink the edges in blue. 
Using the chipboard frame, from above, as a template, trace the lower half onto white cardstock and add a wavey top (for snow drift).   
Ink the wavy edge with blue and add some sparkle on the edge with Stickles glitter glue.
Create a base out of brown cardstock. It's a basic shape that I just drew (freehand) onto the cardstock, approx. 4 x 1 1/2 inches. Ink the edges with brown.
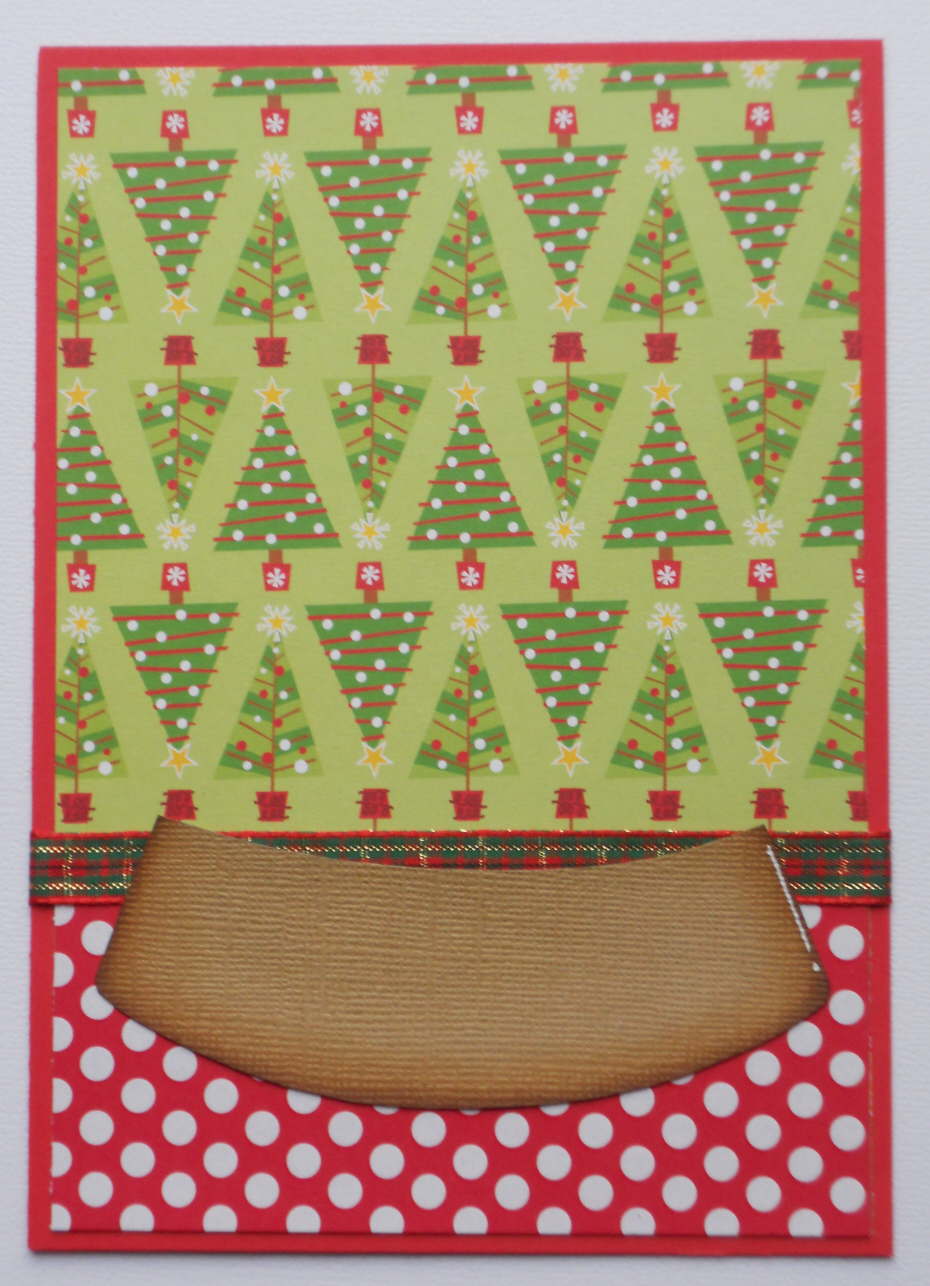
Adhere your patterned cardstock on top of the red cardstock as shown. Adhere ribbon, wrapping around  to the back of the red cardstock. Finally, adhere the snow globe base, leaving enough room for globe and saying above. IMPORTANT-Do not adhere to top of card yet. 

Position and adhere the snowdrift and penguin to top of globe base. Attach snowflake brads and NOW adhere to top of the card. (This way the brad backs and back of ribbon will not be seen) 
Using a tape runner, apply adhesive to bottom of the white circle frame, being sure adhesive covers the entire frame (otherwise glitter will come out of globe).
Center and attach to top of acetate, being very careful not to get any glue on the window part of the acetate. Trim excess acetate around outer part of chipboard. This will be the window of the globe, creating the pocket to hold the glitter.
Pour approximately 1 teaspoon of the tinsel glitter on the center of the image.
Turn your window piece over and being extremely careful to stay on the edge of the chipboard only, apply your Beacon's glue sparingly around the entire bottom of chipboard (leaving no gaps between the glue)  Also, be very careful not to get any glue on the acetate. Line up and attach to top of globe on card, pressing firmly all around, so that it adheres securely all around. Allow to dry completely before standing card, otherwise, glitter will stick to the glue. 
Finally, stamp your saying on white cardstock and adhere to a layer of red and green. Pop dot and attach above globe as shown. Adhere a bow on the top of your saying. You're finished!   

Sunday, May 8, 2011

Some Oldies but Goodies

Since I've been working on many custom orders this past week, I haven't had a chance to work on some of the new collections from Treasure Box Designs. So, in chatting with the design team, Debbie mentioned posting some layouts from the past that we've done. I thought, what a great idea! So, here are some past layouts I've done that are actually all hand cut.


Monday, April 18, 2011

"Backyard Fun"

I made this layout using the Swing Set Collection at Treasure Box Designs. This was a fun set to work with!

Saturday, April 16, 2011

"Blowing Bubbles"

Treasure Box Designs has so many cute patterns, I can never decide on which one to work on first. This week I decided on the Blowing Bubbles set. I wanted the bubbles to appear transparent, so I used vellum. I was happy with the finished look. You can see this layout and a few of my other listings on ebay by clicking on my ebay link.

Wednesday, April 13, 2011

Treasure Box Design Challenge

Although I want to share my new layouts with you, I also want to remind you there's still a design challenge going on. The winner will receive a mini collection, of your choice, from Treasure Box Designs. Just scroll down to the maze mini album for instructions/materials. A winner will be chosen on Monday, April 18th. Have a great day!  

"Bowling"

Here's my latest layout using the Bowling collection from Treasure Box Designs. I had to do some more paper shopping for this one and I'm glad that I did. When you shop for the right paper, layouts come together so much quicker. I try to coordinate 3 to 4 different patterns for each layout, plus solid colors. It may sound like a lot of paper, but other than your background paper, you're not using full sheets. So, you'll have extra paper left to use on something else. Hope you find this tip helpful and happy scrapping!      


Monday, April 11, 2011

"Home Run"

Although we're still having a design challenge over at Treasure Box Designs (see below this post) I wanted to share one of my newest layouts:


Just finished this layout this morning! I don't usually use patterned paper like the one on the left, but with this layout, it really worked out nicely. I've created this layout using the Baseball Collection from Treasure Box Designs. So, many great collections coming out, so be sure to check them out!

Friday, April 1, 2011

"Pooh"

I made this layout using a Cricut cartridge. I was short on time this past week, so I decided to make my first ever layout using a cartridge. I still prefer working with Treasure Box Designs patterns, because I enjoy adding detail to my piecings. The detailing really brings each piece to life and gives it personality.


This layout is now on ebay, be sure to check it out. I will be working on some new pattern sets from Treasure Box Designs as well as a design challenge which I will be posting on Treasure Box Designs Facebook page this coming week, stay posted.

Saturday, March 26, 2011

Fairy Layout


This was such a fun layout to make, a lot of pieces, but so worth all the work. I'll be listing this layout on ebay on Sunday evening. This layout was created using the Fairyland Collection from Treasure Box Designs.    

"Coloring Eggs"

I will be posting this layout on ebay on Sunday evening, be sure to check it out!
Page 1

Page 2

Thursday, March 24, 2011

Been Busy Scrappin' !

I've decided to change my blog background. I'm thinking less is more and the other template was just too busy. So, for now, I'll stick with this template.

I've been trying to stay busy creating layouts, there's just so many great collections over at Treasure Box Designs to choose from, I can never decide on which one to do first. I finally got around to using the Hooked On U Collection, but decided to change the title to "Gone Fishing". Hope you like it and be sure to check out all of my listings on ebay by clicking on my ebay link at the right of the screen. 


Wednesday, March 23, 2011

"Lucky Me!"


Worked on this layout til the wee hours of the night and I'm so happy with how it turned out. I used the Treasure Box Designs St. Patrick's Day collection and wanted to include every piece on the layout. I'm glad I did, because it's a great collection!